
In Spring Framework lots of modules like spring boot, spring web services, spring-security, spring Kafka, spring data, spring integration, spring cloud. etc. spring boot module used to create the spring-based web application.
Learn more about spring boot click on this link- Why We Used Spring boot?
Learn more about spring boot click on this link- Why We Used Spring boot?
Spring boot Example
In this spring boot example provides, how to create spring REST Application with spring boot using Maven project, spring REST, spring MVC, Devtools dependency, java 1.8, STS development tool, Spring Initializr, we are looking mainly used off the @Restcontroller, @Responsebody, @ComponentScan annotation
Steps to Create the Springboot Application
1. Let's create the spring boot project using spring initializer, Go to the start.spring.io and select the Maven project, fill the project name, package name, packaging jar/war, add the basic dependency like Web, Devtools, Actuator. and click on the generate project button. start the downloading. once complete the download, extract the zip folder.
 |
| Spring Initializr |
2. Open the Spring Tool Suite (STS), import the project as an existing maven project.
 |
| spring-boot project |
3. Add the remaining spring-boot maven dependencies in pom.xml from the central maven repository
<?xml version="1.0" encoding="UTF-8"?>
<project xmlns="http://maven.apache.org/POM/4.0.0"
 xmlns:xsi="http://www.w3.org/2001/XMLSchema-instance"
 xsi:schemaLocation="http://maven.apache.org/POM/4.0.0 http://maven.apache.org/xsd/maven-4.0.0.xsd">
 <modelVersion>4.0.0</modelVersion>
 <parent>
  <groupId>org.springframework.boot</groupId>
  <artifactId>spring-boot-starter-parent</artifactId>
  <version>2.1.4.RELEASE</version>
  <relativePath /> <!-- lookup parent from repository -->
 </parent>
 <groupId>in.blogspot.scholars.java</groupId>
 <artifactId>springbootexample</artifactId>
 <version>0.0.1-SNAPSHOT</version>
 <name>springbootexample</name>
 <packaging>jar</packaging>
 <description>springbootexample project for Spring Boot</description>

 <properties>
  <project.build.sourceEncoding>UTF-8</project.build.sourceEncoding>
  <project.reporting.outputEncoding>UTF-8</project.reporting.outputEncoding>
  <java.version>1.8</java.version>
 </properties>

 <dependencies>
  <dependency>
   <groupId>org.springframework.boot</groupId>
   <artifactId>spring-boot-starter-actuator</artifactId>
  </dependency>
  <dependency>
   <groupId>org.springframework.boot</groupId>
   <artifactId>spring-boot-starter-web</artifactId>
  </dependency>

  <dependency>
   <groupId>org.springframework.boot</groupId>
   <artifactId>spring-boot-devtools</artifactId>
   <scope>runtime</scope>
   <optional>true</optional>
  </dependency>
  <dependency>
   <groupId>org.springframework.boot</groupId>
   <artifactId>spring-boot-starter-test</artifactId>
   <scope>test</scope>
  </dependency>
  <!-- https://mvnrepository.com/artifact/org.apache.tomcat.embed/tomcat-embed-jasper -->
  <dependency>
   <groupId>org.apache.tomcat.embed</groupId>
   <artifactId>tomcat-embed-jasper</artifactId>
   <scope>provided</scope>
  </dependency>
  <!-- https://mvnrepository.com/artifact/org.springframework.boot/spring-boot-starter-tomcat -->
  <dependency>
   <groupId>org.springframework.boot</groupId>
   <artifactId>spring-boot-starter-tomcat</artifactId>
  </dependency>
  <!-- https://mvnrepository.com/artifact/javax.servlet/jstl -->
  <dependency>
   <groupId>javax.servlet</groupId>
   <artifactId>jstl</artifactId>
  </dependency>
  <!-- https://mvnrepository.com/artifact/javax.servlet/servlet-api -->
  <dependency>
   <groupId>javax.servlet</groupId>
   <artifactId>servlet-api</artifactId>
   <version>2.5</version>
   <scope>provided</scope>
  </dependency>
 </dependencies>

 <build>
  <plugins>
   <plugin>
    <groupId>org.springframework.boot</groupId>
    <artifactId>spring-boot-maven-plugin</artifactId>
   </plugin>
  </plugins>
 </build>

</project>
4. Create an Employee bean class. i.e Employee.java
package in.blogspot.scholars.java.employee;
public class Employee {
private Integer id;
private String name;
private String dept;
private String address;
public Integer getId() {
return id;
}
public void setId(Integer id) {
this.id = id;
}
public String getName() {
return name;
}
public void setName(String name) {
this.name = name;
}
public String getDept() {
return dept;
}
public void setDept(String dept) {
this.dept = dept;
}
public String getAddress() {
return address;
}
public void setAddress(String address) {
this.address = address;
}
@Override
public String toString() {
return "Employee [id=" + id + ", name=" + name + ", dept=" + dept + ", address=" + address + "]";
}
}
5. Create a service class that contains your business logic, that is EmployeeServiceImpl.java
package in.blogspot.scholars.java.employee;
import org.springframework.stereotype.Service;
@Service
public class EmployeeServiceImpl {
public Employee getEmployeeDetails() {
Employee employee = new Employee();
employee.setId(1);
employee.setName("Narendra");
employee.setDept("IT");
employee.setAddress("India");
return employee;
}
}
import org.springframework.stereotype.Service;
@Service
public class EmployeeServiceImpl {
public Employee getEmployeeDetails() {
Employee employee = new Employee();
employee.setId(1);
employee.setName("Narendra");
employee.setDept("IT");
employee.setAddress("India");
return employee;
}
}
6. Create a Constant class for URL mapping. It is the best programming practice to define all constants separately. i.e UrlConstant.java
package in.blogspot.scholars.java.employee;
public class UrlConstant {
public static final String MESSAGE = "/message";
public static final String EMPLOYEE_URL = "/get-employee";
}
public class UrlConstant {
public static final String MESSAGE = "/message";
public static final String EMPLOYEE_URL = "/get-employee";
}
7. Create the controller that handles all the requests coming from the dispatcher servlet and prepare the model & view object and sending a response to the dispatcher servlet. i.e. EmployeeController.java
Dispatcher servlet is a parent controller that handles every request coming from the server and sending the response to the server.
package in.blogspot.scholars.java.employee;
import org.springframework.beans.factory.annotation.Autowired;
import org.springframework.web.bind.annotation.RequestMapping;
import org.springframework.web.bind.annotation.RequestMethod;
import org.springframework.web.bind.annotation.RestController;
@RestController
public class EmployeeController {
@Autowired
private EmployeeServiceImpl employeeServiceImpl;
@RequestMapping(value = UrlConstant.MESSAGE, method = RequestMethod.GET)
public String getMessage() {
return "welcome to the https://java-scholars.blogspot.com";
}
@RequestMapping(value = UrlConstant.EMPLOYEE_URL, method = RequestMethod.GET)
public Employee getEmployeeDetails() {
return employeeServiceImpl.getEmployeeDetails();
}
}
8. Finally, annotate the SpringbootexampleApplication.java class with @ComponentScan("base package name").
package in.blogspot.scholars.java.springbootexample;
import org.springframework.boot.SpringApplication;
import org.springframework.boot.autoconfigure.SpringBootApplication;
import org.springframework.context.annotation.ComponentScan;
@SpringBootApplication
@ComponentScan(value= {"in.blogspot.scholars.java.*"})
public class SpringbootexampleApplication {
public static void main(String[] args) {
SpringApplication.run(SpringbootexampleApplication.class, args);
}
}
9. How to Run a spring boot application?
Once complete the coding, configuration of the spring application.
Right-click on the project, select Run As and click on the Spring boot App or Java Application.
 |
| spring-boot app run |
10. How to Test a spring application on any web browser?
Open any Web Browser, type the http://localhost:8080/get-employee
It's recommended the spring REST API testing purposed used the Postman or SOAPUI tools.
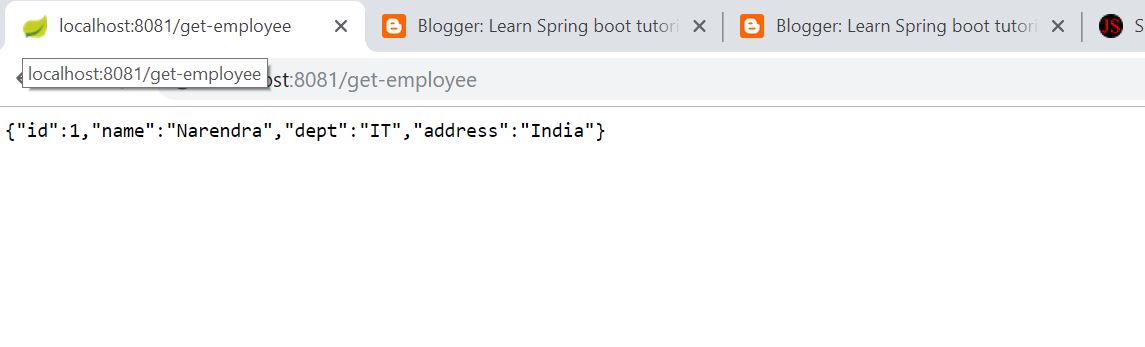
here, localhost -for development stage or application running on the local system.
for production/testing/QA stages used the domain name or IP address instead of localhost. for example https://java-scholars.blogspot.in/get-employee or https://www.abc.com/get-employee
here, 8080 is the default port number of the Apache Tomcat server, if you want to change this port number then go to the application.properties and write the server.port=8081 or as per your choice
here, /get-employee is requested coming from the server to the controller, request handler check exact matching RequestMapping available or not, if available then sending the response. if Not available throw the 404 exceptions.
11. How to create an executable jar/war of the spring boot application? or maven command for jar/ war creation of the spring boot application.
Right-click on a project, select Run As and click on a Maven clean,
Right-click on a project, select Run As and click on a Maven build, write the goals: package and click on Run button.
12. How to deploy spring boot application in Apache Tomcat server?
Created a jar/war location inside the target folder of your spring boot project.
When deploying the spring boot application on any server then pass the complete path of the jar/war file. Let's go to the command prompt for the deployment of jar/war.
C:\WINDOWS\system32>java -jar V:\target\springbootexample-0.0.1-SNAPSHOT.jar ↚
Above command applicable for both packaging type(jar/war).
13. How to stop the server?
control + c
Spring boot related most important topics are-
What is spring boot?
What is spring boot?
Advantages of Spring boot
Why we used spring boot?
Top java logical programs
Click here for download the project- springbootexample.zip
Why we used spring boot?
Top java logical programs
Click here for download the project- springbootexample.zip
Click here for download the project- springbootexample.zip


